I  know it has been a little while since I made a post here, but that is simply because I have been busy in the shop! It is a long post, but reflects what has been going on the past couple months.
First thing, is I finished what I previously referred to as the mystery project, which is a cradle for my wife’s cousin and her new daughter. When I decided to build this project, I had very little time to complete it, but I figured that would add to the challenge of completing an already challenging project. I love a good challenge! 🙂 I started out drawing a design using Sketch Up. After making a few slight revisions, and worked my way through some design challenges, I got started. My plan was to make the frames of the panels out of  maple, wi
 th cherry inserts. I started out making the parts for the two end panels, both of which were the same. The frames are being assembled with haunched tenons, which create a very strong joint. The two side boards (the stiles I supposed you could call them) are also be where the side panels attach to the end panels. After dry fitting the end panels, I went on to make the two side panels, including the tabs that will help fit the side panels to the end panels. After fitting all the parts together for the side panels, I went ahead and did the glue ups for them.
  Once the glue was dry, I was able to mark on the stiles for the end panels precisely where the tabs of the side panels will meet. I then proceeded to cut out the tabs before the glue-up of the end panels, and made sure I had a decent rough fit, with enough material left to further tweak for final assembly. Before gluing up the end panels, I went to the band saw and cut out some of the more intricate curves on the runners, but left the larger curves for after assembly. This allowed me plenty of flat clamping space so I could achieve good solid joints.


 After the glue dried, I cleanup the glue lines, and then put an extension table on my band saw. This allowed me plenty of table space to cut the curves for the runner, and to make a nice profile across the top. From there, I cleaned up all the glue joints, lots of sanding, and putting round-overs where round overs where needed. This did involve some time with rasps and other hand tools to make the round overs look right on the inside corners.

 This brings us to final assembly. This involved a LOT of dry fittings, and a LOT of tweaking of all the pieces. I kept doing this until I achieved as square a fit as possible. My awesome wife also helped me with a lot of these dry fittings as it proved to be very difficult to put together with out a helper. She also helped me with the final glue up. Once glued up, I flush cut and sanded all eight tabs, the sanded all the joints smooth. From there did the final sanding, working my way up to 220 grit.
 With the cradle now ready for finish, I took advantage of the heat wave were having and applied two coats of boiled linseed oil. The high heat helps the oil to dry and cure fairly quickly. I let the second coat of oil sit for several days to give it a chance to cure and off gas. This brings me back to a point I made earlier in the post, and a lesson learned. The lesson being, just because you pull a board off of the maple shelf from hardwood supplier, does NOT mean it is maple. Now, up until the point of finishing, the color of all boards where pretty close (as shown in the pictures) Imagine my surprise as the oil brought out the color of the wood (which is why I like using oils) that some of the boards were not at all maple, but were in fact cherry! Thankfully I already had cherry elements in the project, and where the boards ended up worked very well, and added a lot of character to the overall project, and I really liked the look of it.
A fter the oil was dry and cured, I applied man coats of shellac, with sanding between each coat. After the shellac was dried, I made the bottom panel and put a couple coats of shellac on that as well. From there my wife took care of getting the mattress, sheet, and bumpers for it to make it comfortable for the baby.
Today we delivered the cradle to my wife’s cousin, and her new daughter appears to be very comfy in the cradle!
After completing the cradle, I cleaned up the shop and sharpened all my chisels and planes. I also decided that I would get started on turning some Christmas gifts so that I would have plenty of time to get them done. Someone I think I will be making them last minute again this year.
Finally, I do have a bit of a tool gloat! 🙂 If you recall in the shop tour video I did back in January, I showed my bench top jointer and basically said it was a POS. Well it has finally b een replaced! I ordered a freestanding jointer from Grizzly and had them deliver it to me. Due to the weight (240lbs!) it was shipped freight. It was a pretty awesome feeling seeing the UPS Semi Truck pull up to the house to drop that thing off! It took me a couple evenings to put it together and tune it up, but from the test runs I have taken on it, this is definitely light years ahead of what I had before.

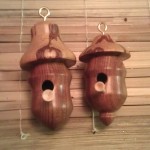
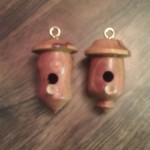 Despite the lack of updates, I have been busy in the shop, largely spending time at the lathe turning Christmas ornaments for family and friends. This year I tried turning miniature acorn bird houses. These were a lot of fun to turn! I am also participating in another challenge from the chatroom on The Woodwhisperer.com website. This time it is a box. I will update the blog once it has been completed. The hand tool cabinet hasn’t changed much since its last post, that may have to wait till Spring before I work on it again.
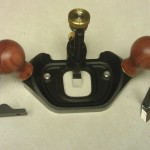 Finally, a couple tool gloats. First back in November, I went to the Woodworking in America show near Cincinnati. While I took advantage of a number of good deals, my main purchase was a Veritas Router Plane. I must say, it is a very well made hand plane, and I will likely be buying the smaller blades for it as well.
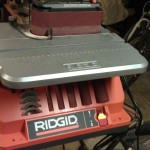 The second gloat, is for Christmas my family got me the Ridgid Oscillating Sander. This thing is great is at doubles both a spindle and belt sander, and really excels at smoothing cuts from the bandsaw, both inside and outside curves.


