
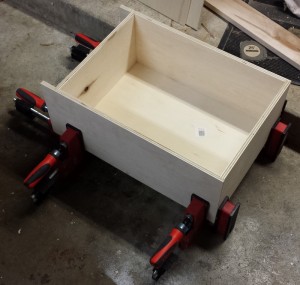
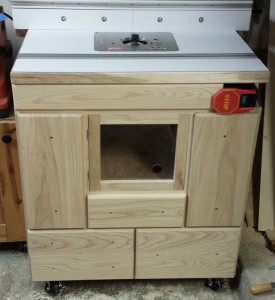
 One of my requirements for a new router table was a cabinet that had plenty of storage. So I designed it with 4 traditional drawers and 2 vertical drawers. The traditional drawers are basic plywood boxes, with an applied hardwood front. The boxes were assembled using rabbets and dados. There is a groove in the bottom to accept a 1/4″ thick piece of plywood for the bottom. The drawer boxes are sized so that they slide in and out of the cabinet easily. The backs of the drawers are inset a couple inches so that they can slide out enough that I am able to get full access to the drawer contents, but it won’t fall out of the cabinet.
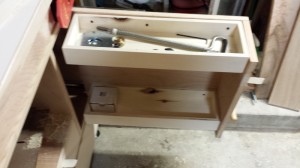 The vertical drawers are something unique I came up with, that will hopefully give me a greater amount of flexibility on my storage needs. The concept is very similar to what I did for the hand tool cabinet. The main panel is a 3/4″ thick piece of plywood attached to the sides of the cabinet with full extension drawer slides. A front is attached with brackets and pocket screws. The right vertical drawer I have a couple shallow boxes attached to it that stores everything I need for bit changes and adjustment. This has proven to be very useful. Currently the left vertical drawer is empty, but I plan to use this mainly for bit storage.
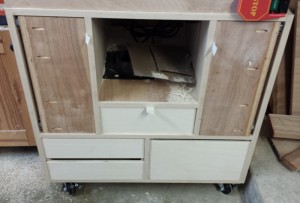 The fronts of the drawers are made from ash. The fronts for the bottom 3 drawers were made from one panel of wood so that I can get a good grain match. I also attempted to make the 2 smaller drawers look like they are one piece, though it is two. Attaching the drawer fronts turned out to be straight forward. Since I am turning the pulls on the lathe, I figured I could use that to my advantage. I measured out and predrilled screw holes with a fairly deep counter sink. I then put screws in enough that I could push them against the draw box. Once I was satisfied with the alignment I screwed the screws home. I then put it four more screws from behind to get a solid fit. For the space directly under the router table, the front was a piece of plywood which looked out of place next to all the ash. So I made a false front in the same style of the drawers.
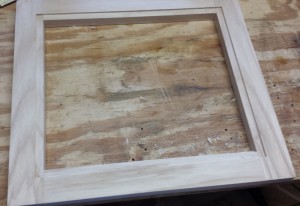 The door is similar to a frame and panel door, except that instead of a wood panel, it is using a plexiglass insert. I didn’t want to run a groove all the way around, so I used the router tablento put mortise on each end of the 2 stiles. I did this on the router table with a 1/4″ bit. Using a rabbet bit I made the tenons on the rails. I then glued up the frame. Using the same rabbet bit, I put a rabbet all the way around the back of the inside portion of the frame which is deep enough to accept the plexiglass and push pins to hold it in place. After routing out the rabbet, I used a couple chisels to square the corners. On the front, again inside the frame, I routed a round over. Using my rasp and some sand paper I cleaned up the corners. The plexiglass panel has holes drilled into it for back flow for the dust collection.
 All that is left is the pulls. They aren’t done yet, and will likely be the last thing I do for the router table. If I don’t get them done before the final post on the router table, I will post a picture of them in a future general update post. Otherwise, from the front the router table looks complete visually. However, there is still a bit more to go on the build, which I will go over in the next post.