Tool Review – Grizzly G0555P, Polar Bear Series 14″ Band Saw

Published on by Mike  (2 Comments)

2013-04-20 20.25.15To try to bring more variety to my blog, and hopefully to help other newbie woodworkers make purchase decisions.  Most, if not all, of the tools I will be reviewing have been purchased for my normal usage.  However, on the very off chance someone sends me a tool to review, I will always indicate how I came by the tool I will be reviewing.  I think it is only fair to you, the reader, should know where the tool came from.  I will always try to minimize bias as much as possible.  Also, please comment with your good and bad experiences about the tools I review here.  This will make the review that much more useful for others out there.

2013-04-20 20.26.20
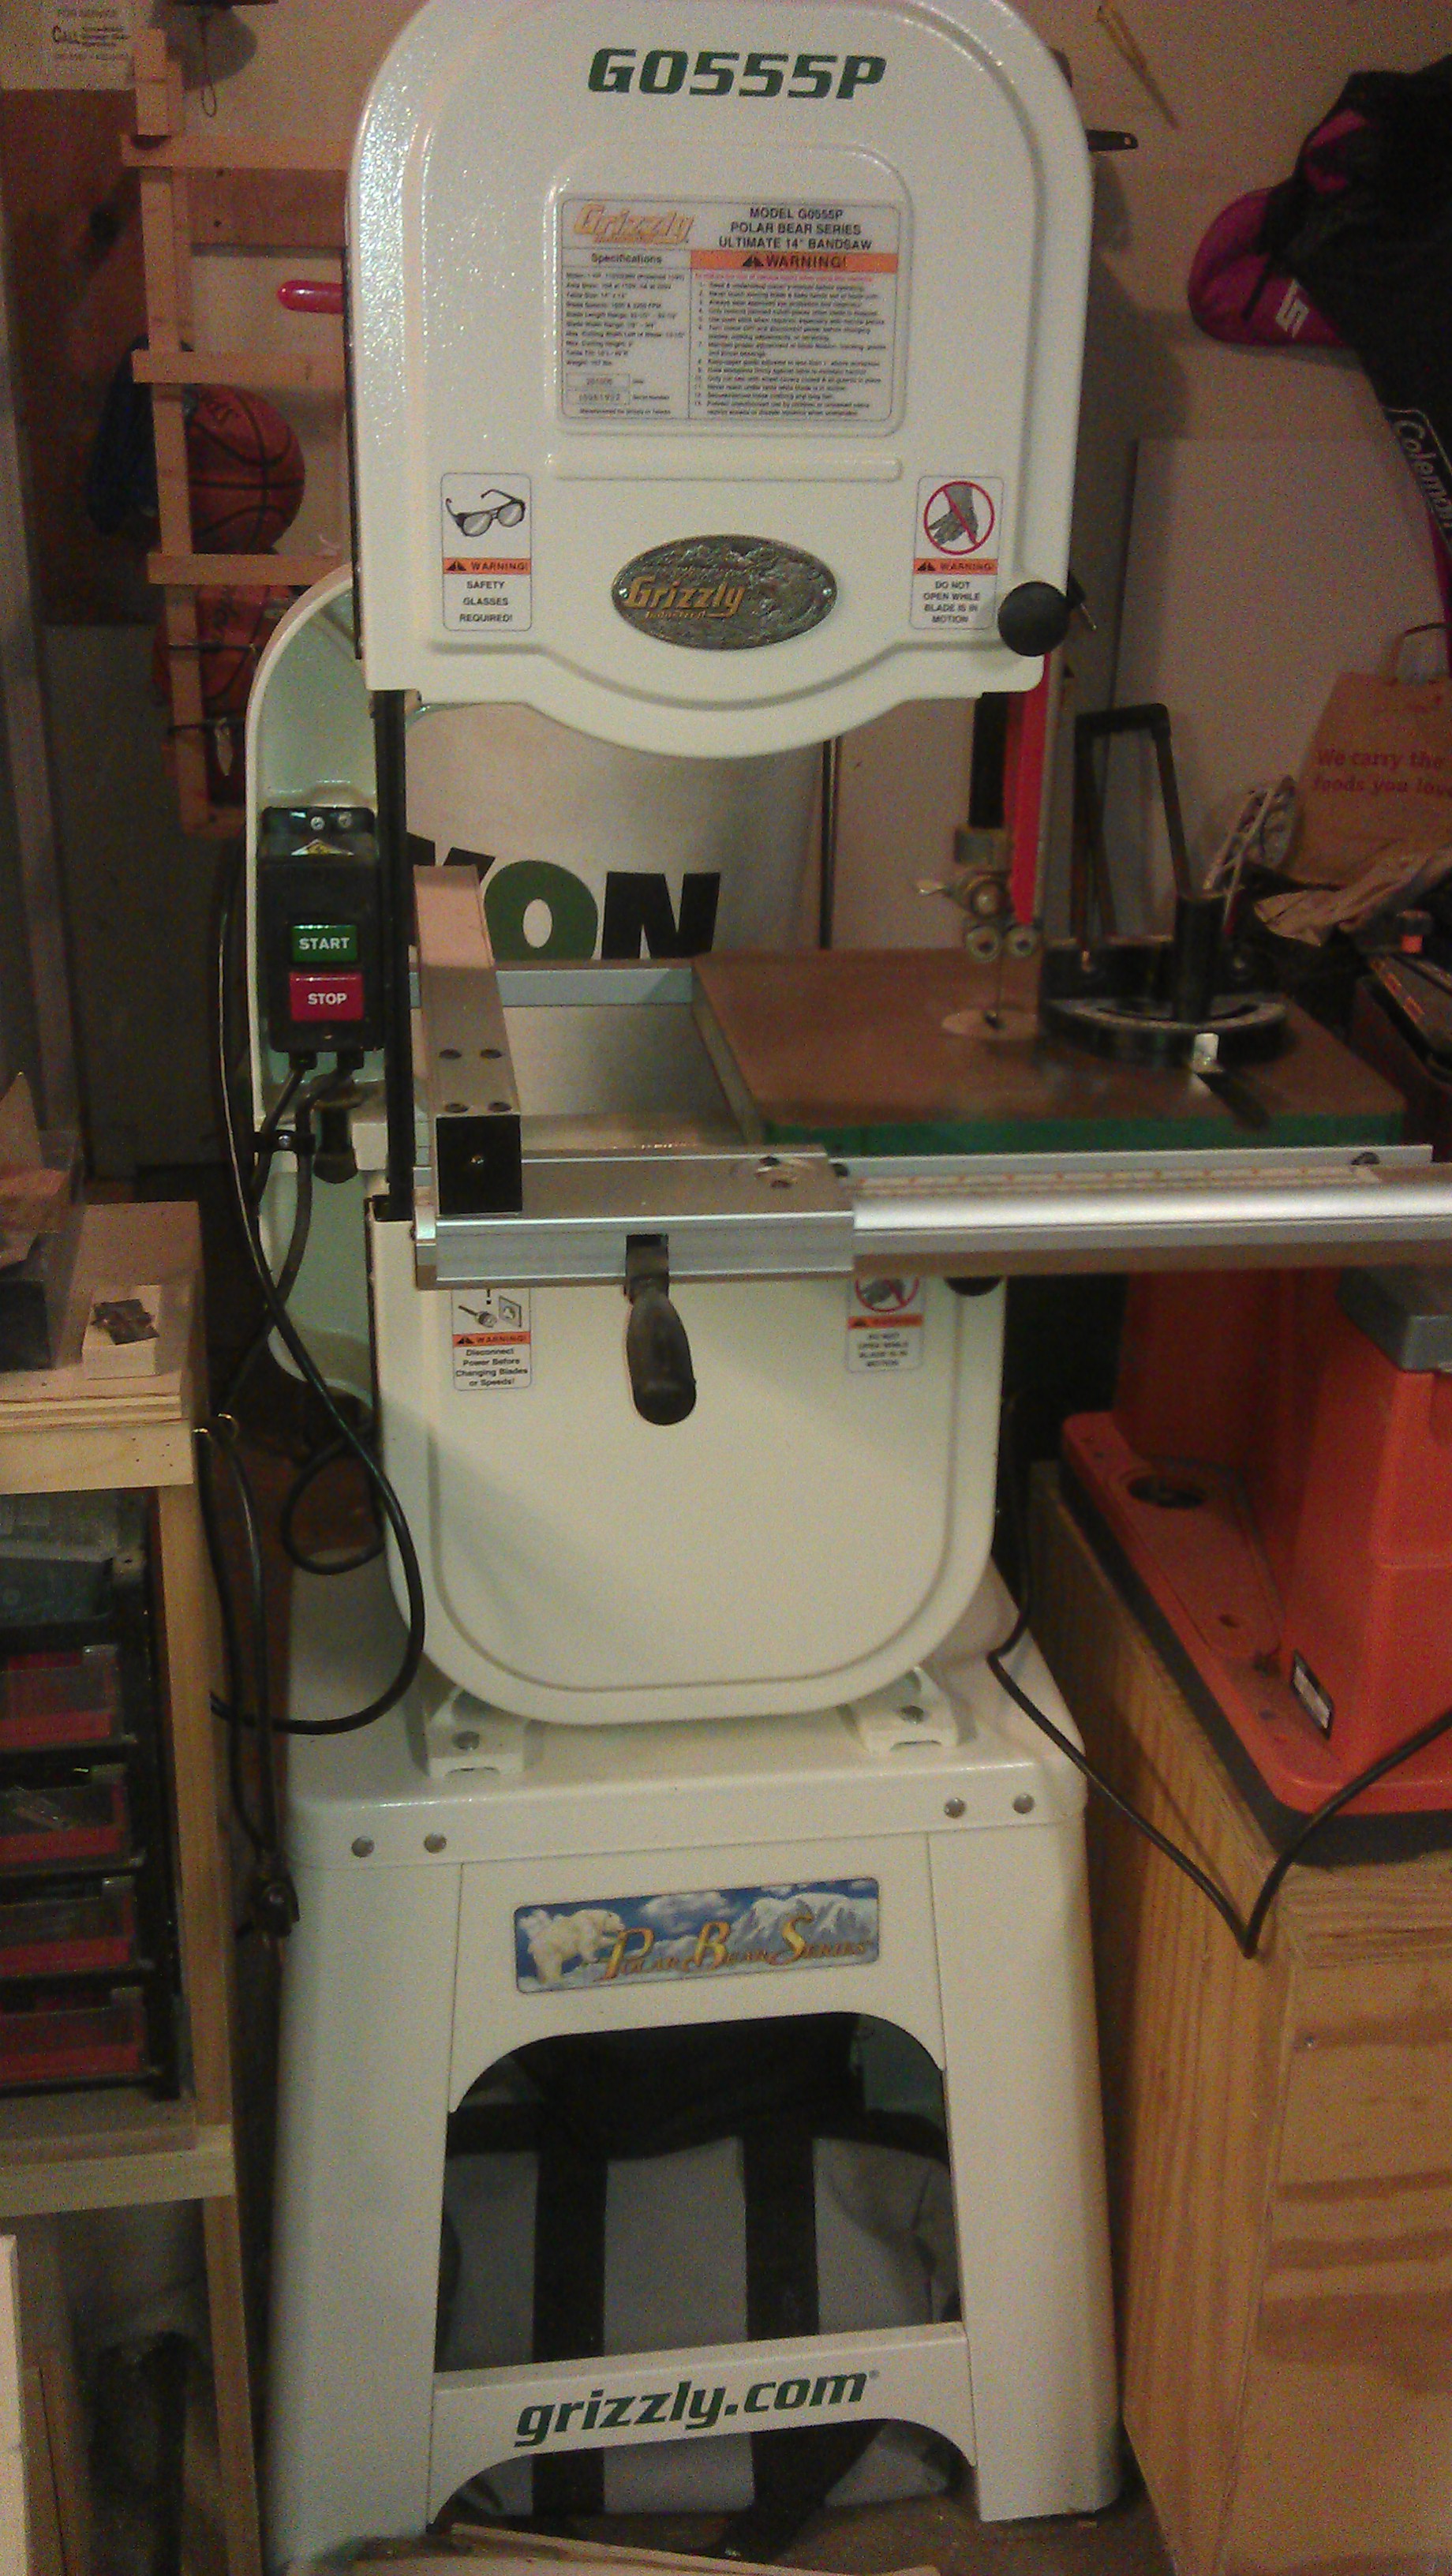
The first tool I am going to review is my band saw, specifically the Grizzly G0555P.  I purchased this saw early Spring of 2011, so I have had it for around 2 years.  Order and delivery were uneventful.  I ordered lift gate service, however with my lack of understanding that freight works bit differently then package delivery, I took the day off work for the date the tracking website said it would arrive, not realizing the arrival date was not to my home, but rather to the freight depot.  Not able to take another day off, I ended up driving up to the depot and picked the saw up from there.  Other then skipping out on the lift gate services, the freight aspect went smooth.

2013-04-20 20.26.30The saw and all of it components came well packed in one large box.  Unpacking was straight forward, and each component was well protected.  It did take two of us to lift the main saw out of the box.  Assembly was not difficult, and took me a few hours.  Most of the assembly was easily done by myself, but I did need some help lifting the main saw body on to the stand.  The instructions for assembly were outstanding, and made assembly go smoothly.  Tuning of the saw went well also.  The instructions were very clear on this process as well.  I will say, I did not use the blade that came with the saw.  From what I have read, the stock blade was okay at best, and others had recommended going with a better blade.  So I put a 1/4″ Timber Wolf blade on it, which has been the primary blade I have used on the saw.   First time I powered up the saw I was amazed at how quiet and stable the saw was.  It passed the nickel test with flying colors.

2013-04-20 20.28.35
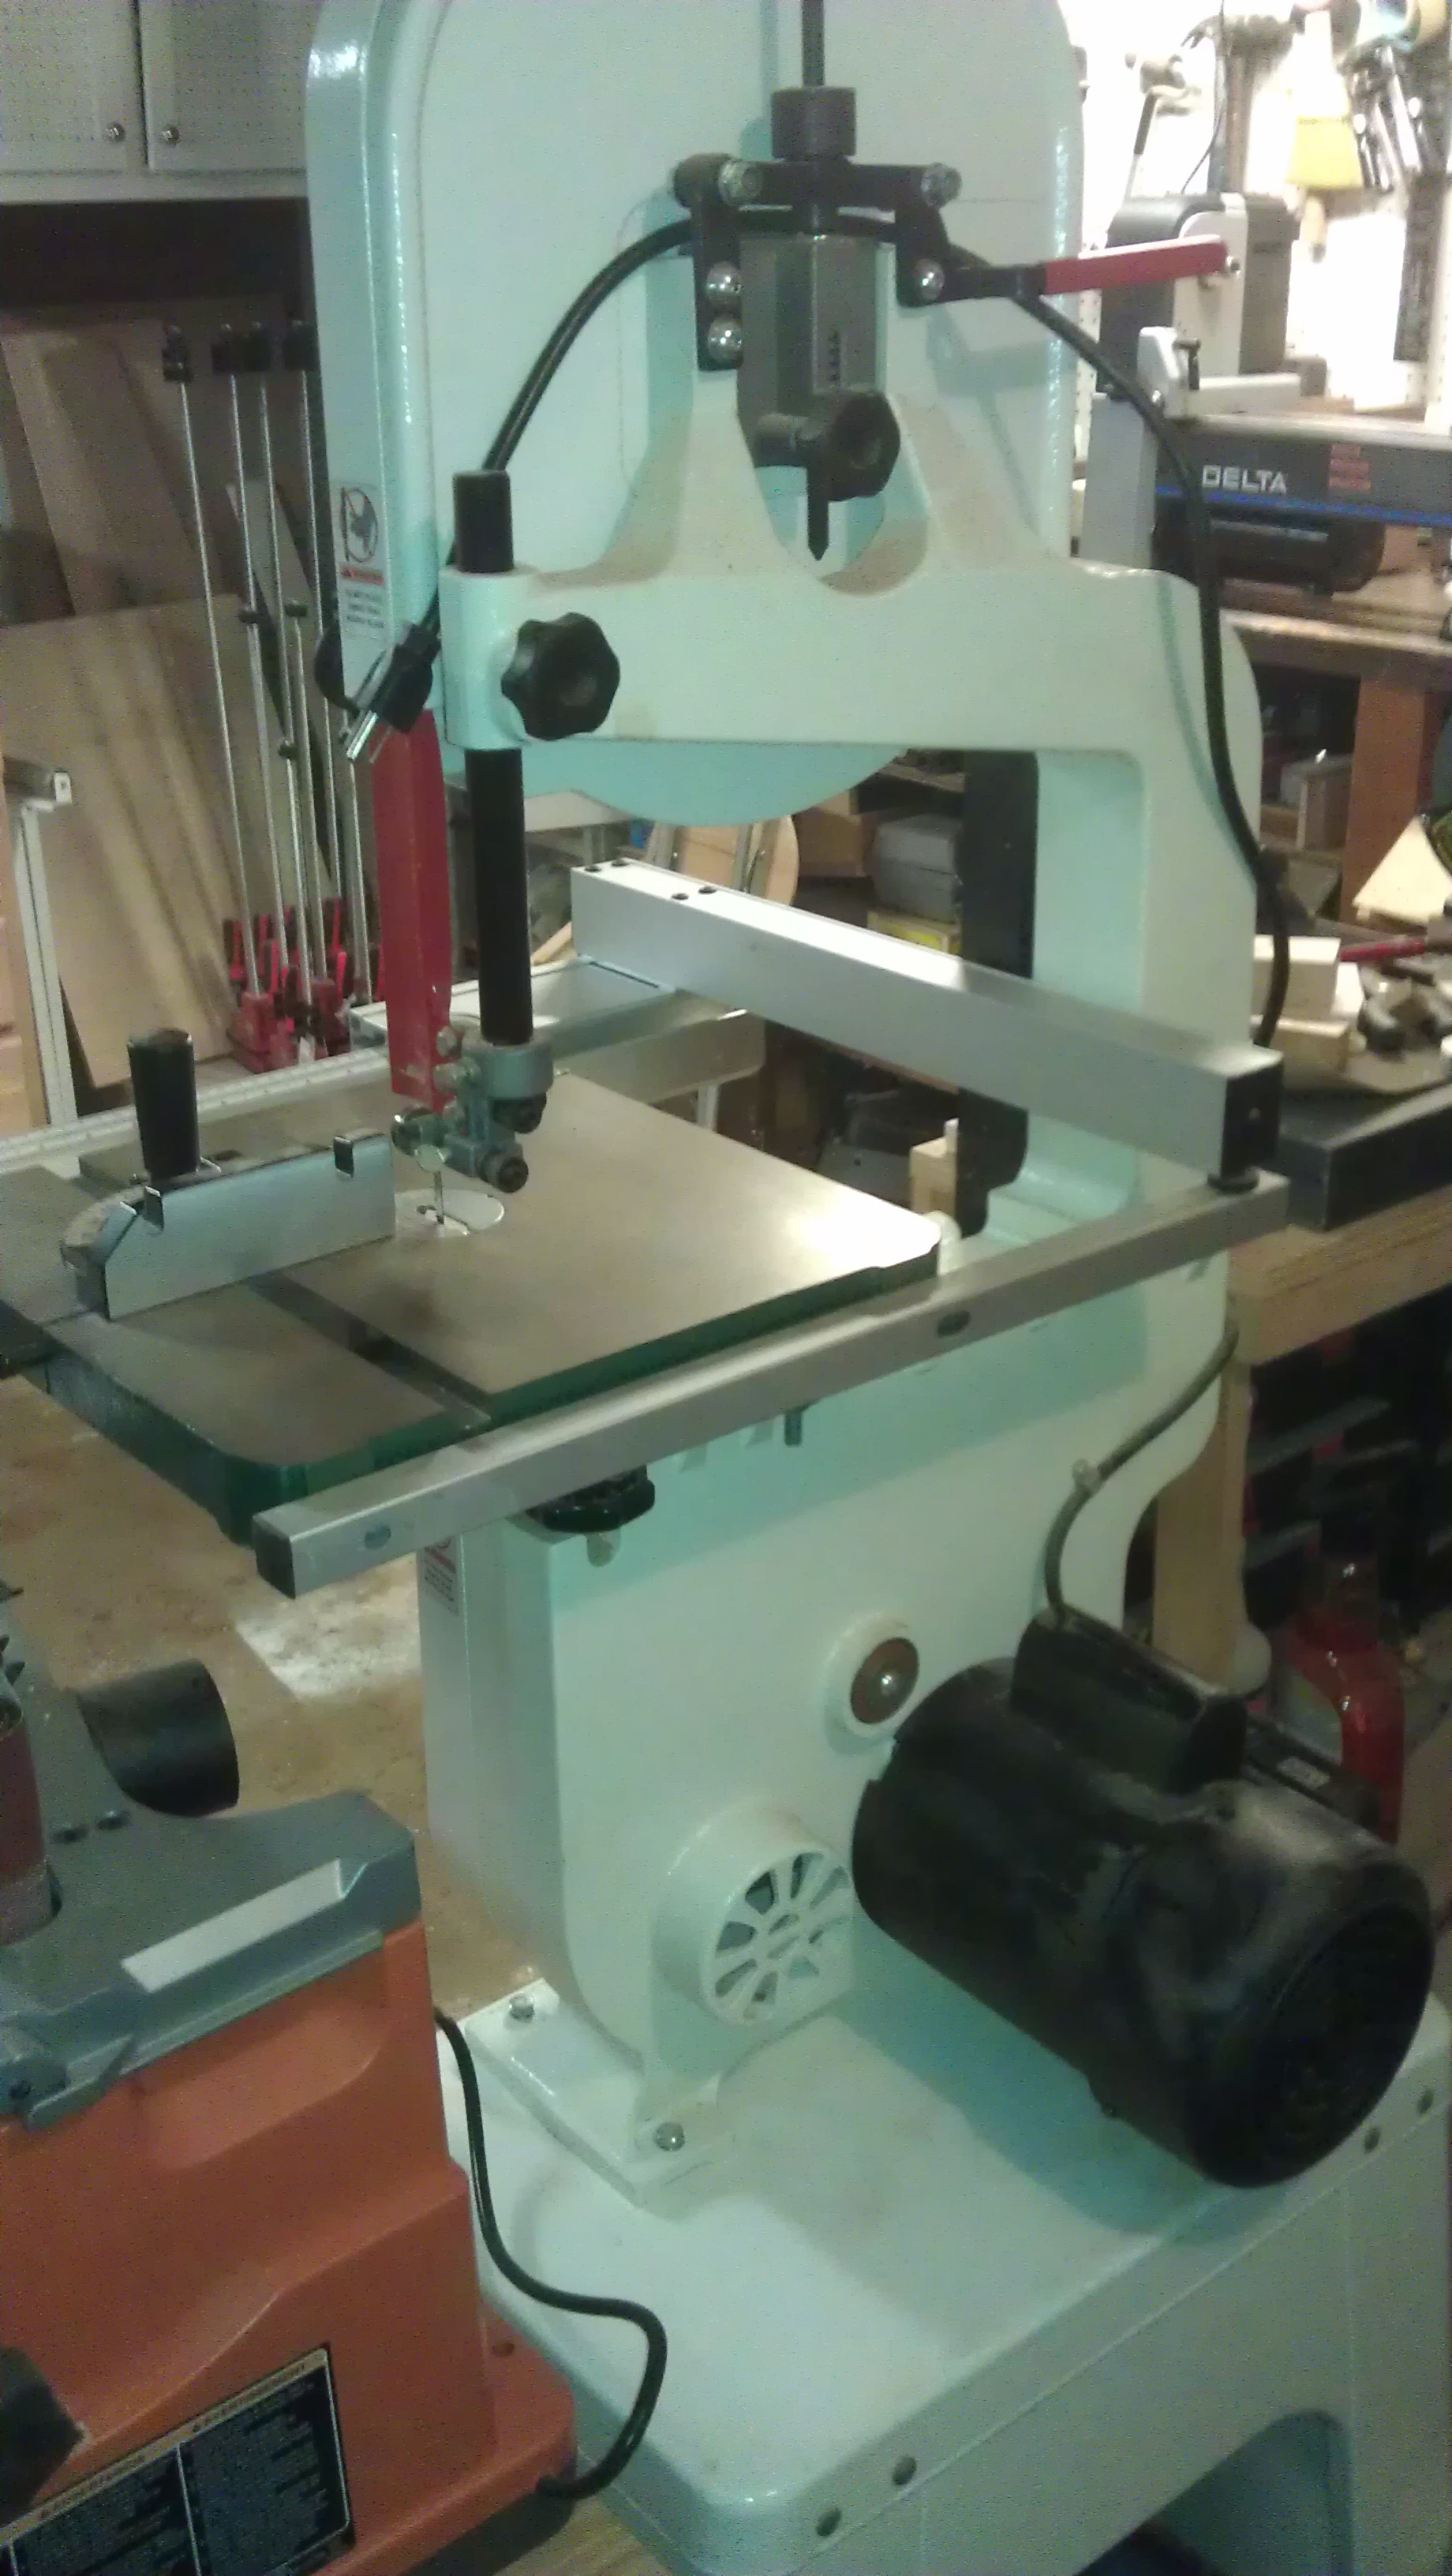
Overall, the fit and finish of the saw is excellent.  The only real negatives I have about the saw is on the guide bearings, and the fence.  Neither of them are truly bad.  The complaint I have with the guide bearings is that they are noisy.  They otherwise work fine, and do well with keeping the blade straight.  The fence is okay for most straight cut operations.  The lock handle is the main issue, as it sometimes doesn’t lock down as tight as it should.  I now always give it an extra push down to make sure it stays in place.  The fence adjustments for drift are not great.

2013-04-20 20.29.00
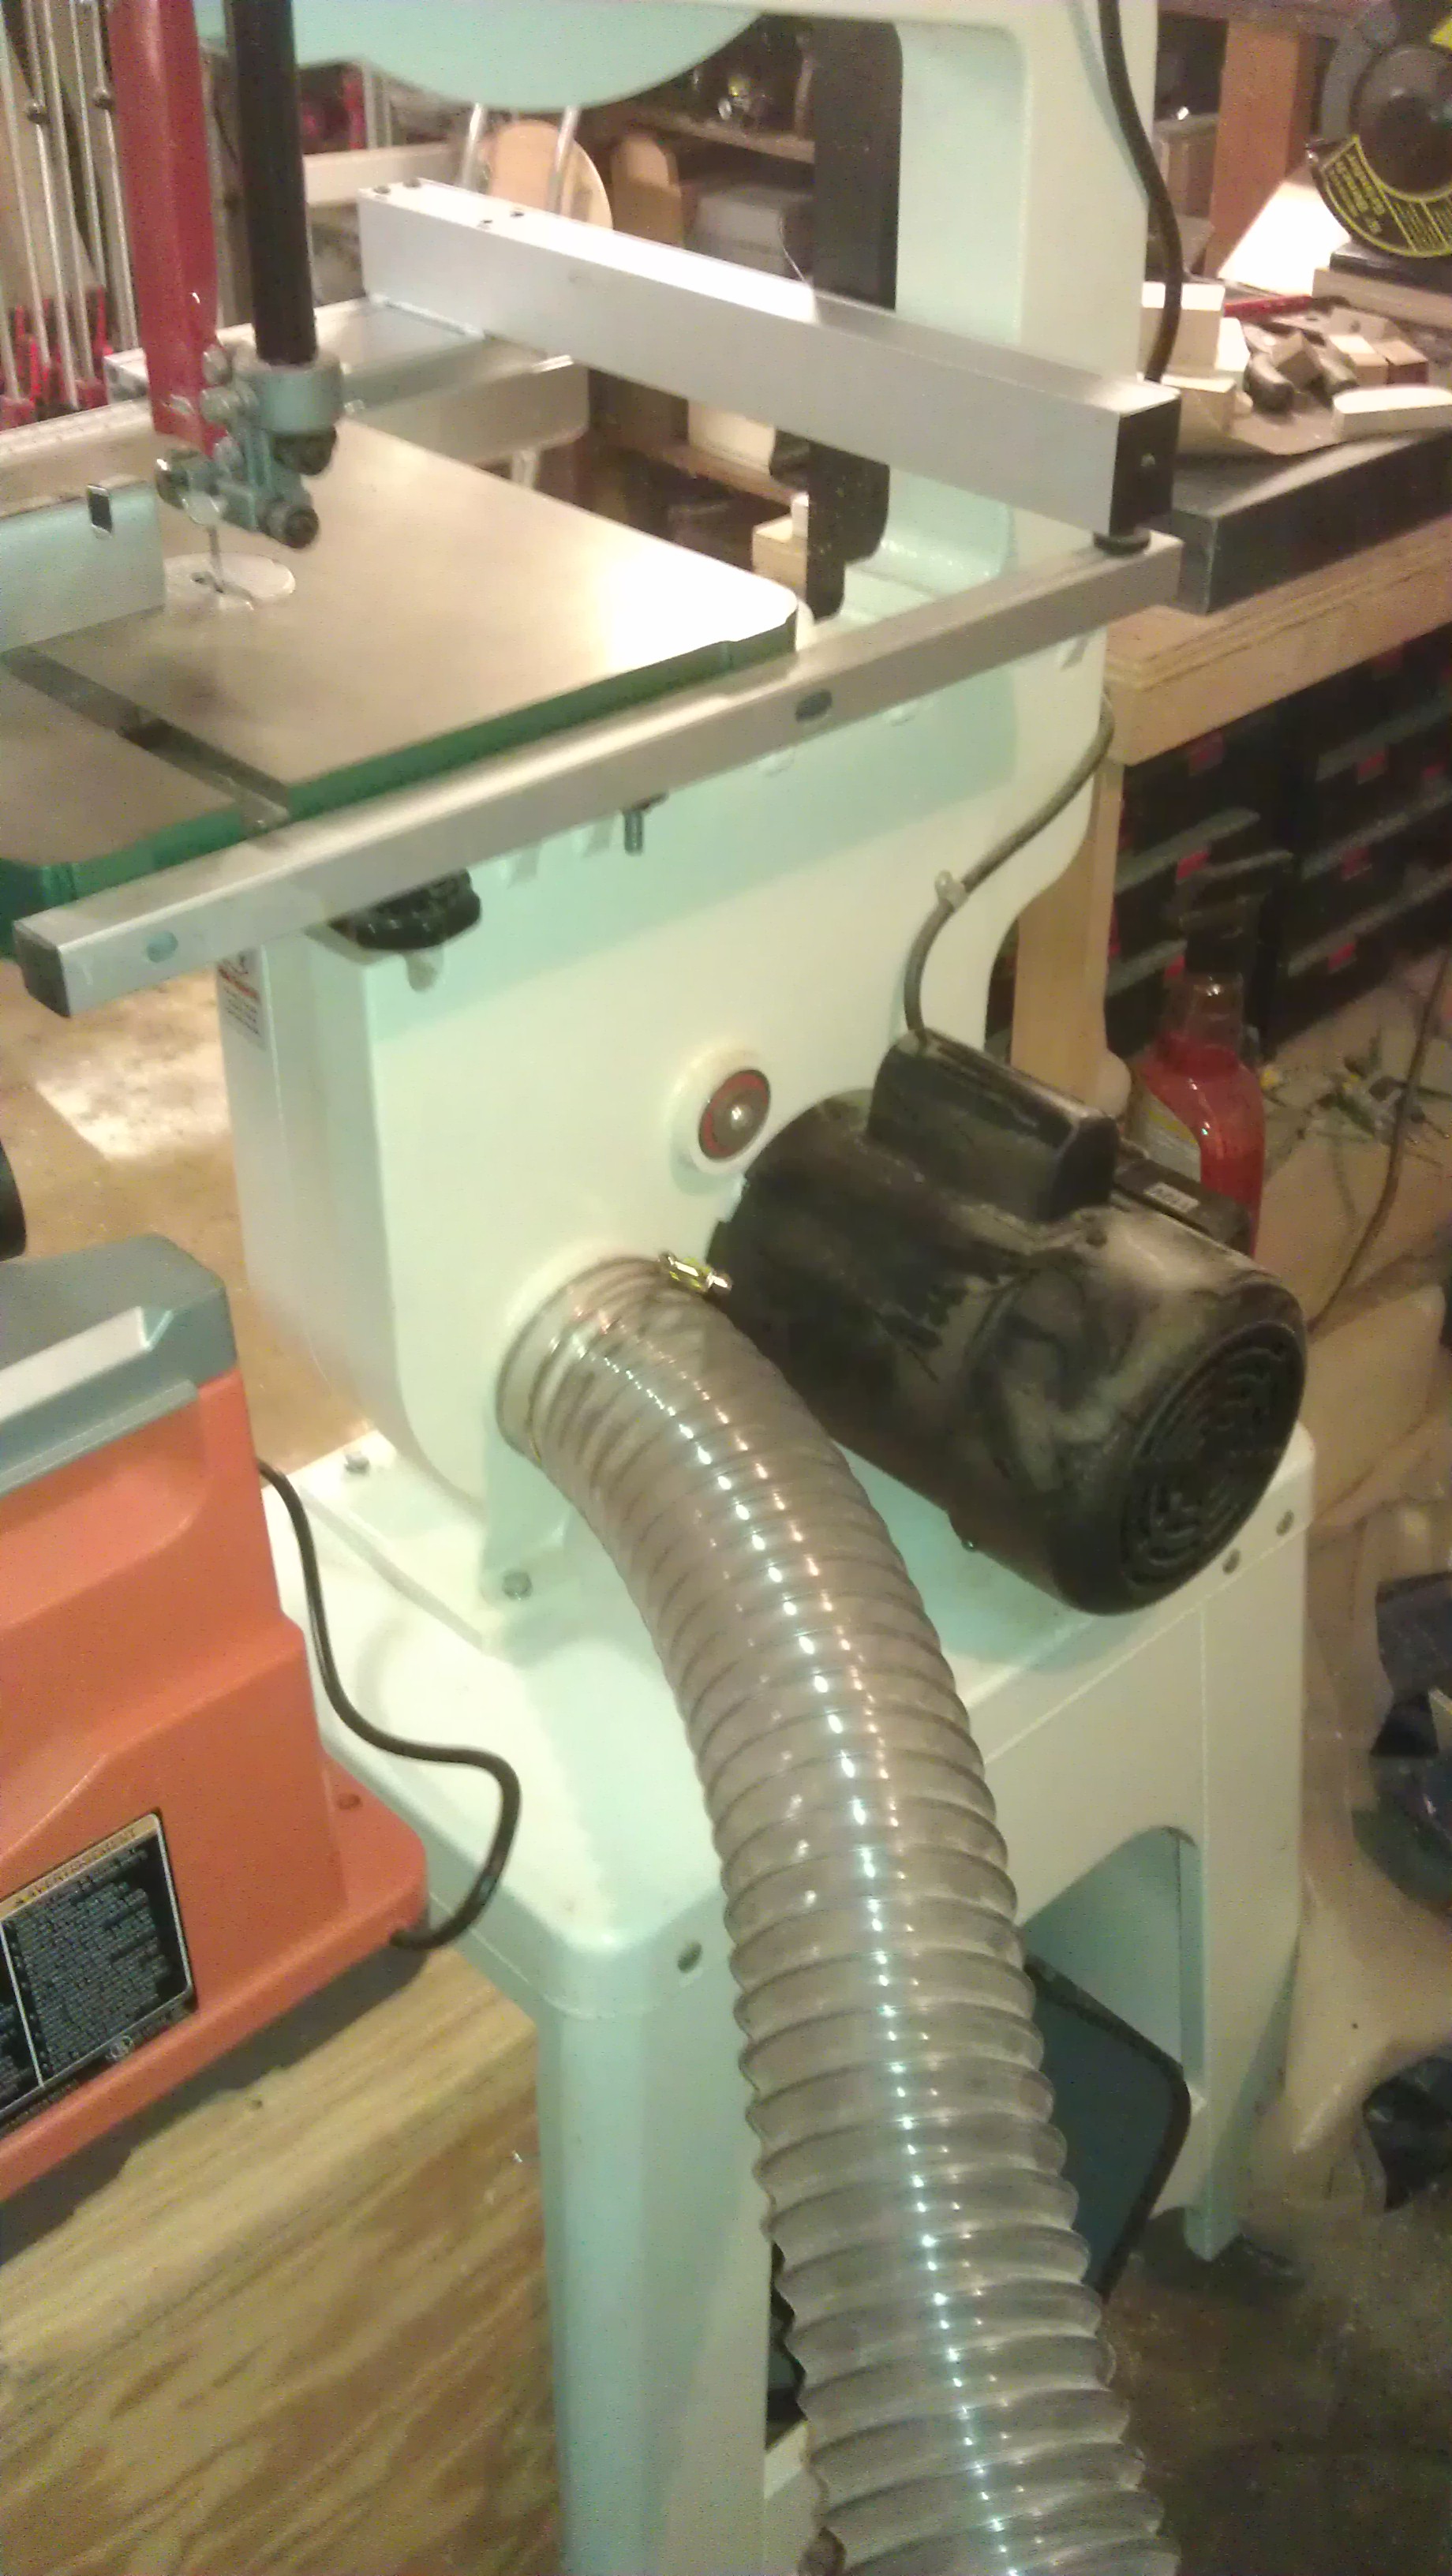
The saw has a single dust collection port in the back for a 4″ hose.  This does an adequate job clearing the dust from the machine.  Except for a little bit of dust left on the table after making a bunch of cuts, there is typically very little sawdust left in the saw itself.

The actual use of the saw has been outstanding!  Once everything was adjusted on a brand new blade, drift was virtually non-existent.  I have even cut thick bowl blanks on it, and the saw cut right through them with no issue.  In the two years I have been using it, has done everything I have expected of it, and never gave me an issue.    All in all, if I had to do it over, I would have no complaints buying this saw again.

Full product specs here

As a note, I do not yet have the rise block or mobile stand for the saw.  These will likely be future additions as I encounter the need for them.

Box Challenge – Finished!

Published on by Mike  (Leave a comment)

2013-04-19 23.20.46 Despite the fact I long missed the deadline of the original challenge, I continued to push forward on getting the box complete.  Now that the weather is warm(er) I am getting out in the shop more.  While my main focus in the shop is the hand tool cabinet, and Erick turning pens, I didn’t forget about the box.

2013-03-10 20.54.31In my last post I mentioned that the box was almost completed, that I had an idea to cover the hole left from the wood worm screw from when i used the lathe to make a domed top.  What I came up with is a sort of medallion made from a small piece of walnut with my initial “M” on it.  I don’t really have any carving tools.  I ended up using my trim router with a V groove bit and free handing the M over layout lines I drew on the work piece.  I then simply used my bench chisels to straighten out the lines of the M.  I then attached to the bottom of the top, resulting in no more ugly hole!

2013-04-19 23.21.12About a month ago I put a couple coats of boiled linseed oil on the box, and I let it set.  Since we were getting days consistently over 50 the boiled linseed oil slowly cured.  From that point I started wiping on shellac.  I believe I put on 5 or 6 coats of shellacs, till I got the look I was going for.

Now that the finish is on and done, I am really glad I paid close attention to the grain of the wood.  Where the grain continuing around the entire perimeter of the box wasn’t real noticeable, with the finish, it really pops out.  The effect really cool.

2013-04-19 23.21.30As with any good challenge, I learned a lot on this, and strengthened many skills.  While my dovetails still have room for improvement, I feel I now have the confidence to use them in more projects.  Also worked on my hand plane skills when I raised the panel on the bottom .

Looking forward to the next challenge project.  Maybe I will even finish that one on time!  Thank you to Roger for hosting the challenge, and thank you to

More thoughts on the power vs. hand tool debate

Published on by Mike  (2 Comments)

2013-04-19 22.45.53_enhancedThe heated debate from a few weeks ago seems to have settled down, but the discussion continues, I think for the good.  I have been reading through the various blog posts and tweets on this subject, and have found it thought provoking.

One of the blogs I read described how there is a tendency to use power tools to mass produce projects, thus reducing their uniqueness and the artistic value is lost.  (Noting that dollar value is lost as well)  It isn’t that big of a stretch to realize that we as woodworkers can and do get trapped in that same mindset when working our own projects, thus losing the “woodcraft” or artistic value within our projects.  To be honest, I don’t think I can disagree with this.  Why?  Sometimes we as woodworkers focus on getting to the next step of the project as quick as possible rather then putting our heart and soul into the project as a whole.  I think part of what makes a project woodcraft is allowing the flow of the project to come together organically rather than systematically.

The big question is, does this change my view point in my last post on this subject?  I did have to think about this for awhile, but I do still feel the same way.  I believe that this organic flow can be achieved using power tools, hand tools, or a combination of both.

Where I also did some thinking is what it takes to achieve woodcraft.  Don’t get me wrong, organic flow of the project is a significant part of it, but its not everything.   Its also taking the medium we are presented with, understanding its properties, imperfections and other qualities that makes it unique, then using the mind’s eye to work it into an art piece.

Admittedly, I do believe using hand tools does make it easier to bring us closer to the work piece leading to a better understanding the wood’s properties.  For me, when I started using hand tools, I did start looking at my projects in a different light, and in fact I feel that using hand tools has made me a better woodworker in general.

So how is all this possible using power tools.  The obvious answer is start out with power tools for doing the tough work, the finish up using hand tools.  That is one way, but I don’t think that is the only way.  I think as long as a woodworker stays out of the batching out mass produced parts mindset it is very feasible to complete an artistic project.  Ultimately, I think it goes back to allowing the project to flow organically as well as using the minds eye to determine what tool is used.

A few shop and blog updates

Published on by Mike  (Leave a comment)

2012-09-03 20.37.16So, the good news is, it has finally started warming up outside.  Last weekend I bought wood for the tool cabinet, and milled and sized it for the two door boxes and completed the joinery for it.  I bought the plywood for the backs (1/2″ Baltic Birch Ply), and then started cutting the grooves for the plywood.  Unfortunately, as switched from the short to long pieces I hit the release on the fence, and didn’t discover it till the cuts were complete.  I didn’t release enough for it to be completely loose, but enough to move it as I held the board against the fence.  So each piece has the groove in a different spot.  Therefore, those boards will now be re-purposed to other parts of the cabinet, so the wood will not got waste.  However, as I don’t have enough full length boards to get 4 36″ long pieces out of it, I am going to have to make another trip to Muterspaw Lumber next weekend to get more wood.  I still haven’t decided what I am going to do for the drawer fronts, I just know I want them to stand out some how.  Hopefully next weekend I can make an actual update about real progress on the cabinet!

Another shop update is that you may not just see me working in the shop.  My step son has taken up pen turning, so you may see him working on the cam from time to time too! Perhaps someday I can get him to contribute on to the blog too…….  Okay, I wont push my luck on that one! 🙂

2012-09-10 18.34.04Finally, if you are following along my blog, I have talked about the dedicated shop computer I have set up.  The computer is old.  The wireless card built into it didn’t support “N” which limited its range.  Well, I finally gave in and bought a new USB wifi network card.  The good news is, it seems to have worked!  I ran the stream for 3 and half hours without interruption!  So when I tweet out that the cam is up, it really will be!!  🙂

As for the blog, no major site updates to speak of.  I did however make a Facebook page for the blog.  You can visit it at https://www.facebook.com/Sawdustnewbie.  For all you Facebook fans, this gives you another option to follow my blog.

Also, I think it is worth noting, that the blog did recently hit a milestone.  The site reached 5000 views!  Traffic to the blog has steadily been increasing.  Thank you all for taking the time to visit my blog, and hopefully soon the blog will reach 10,000 views!

New Table Saw Fence – Part 5 – New Wings

Published on by Mike  (Leave a comment)

Original Posted on November 3rd, 2010

new_wingsAfter a couple months of usage, the new fence is worked out great! One issue I noticed immediately was that the old stamped steel wings were no longer stable after removing some of the bolts to make the new fence fit. Plus with the longer rails, I felt like I was missing out on additional work area. So to the solve that problem I made two new wings. The left wing is roughly the same size as the old wing, while the right wing takes full advantage of the new rails.

wing_bottomConstruction was very straight forward. Looking at the bottom, while fuzzy, should give an idea of how it is constructed. The bulk of each wing is two pieces of 3/4″ mdf laminated together to make a surface that was 1 1/2″ thick. Notice all the screws on the bottom. Before any glue touched the MDF, I predrilled and prescrewed each screw to make the pieces lined up properly, and to make sure that the top piece didn’t lift away from the bottom during glue-up. After glue-up came the edge banding. The edge banding serves two purposes here. First it makes a clean looking edge. Second, and much more importantly, it provides the structure to bolt the wings to the saw and rails. I intentionally made the edge banding wider than 1.5″ and initially attached them proud of the top surface. I only attached two bands at a time using glue and nails. Once each of the bands were attached and the glue was dry, I flushed them up with the router using a flush trim bit. After completing the edge banding, I covered the top of each wing with a sheet of Formica, using contact glue and a j-roller.

Finally came time for installation, and this was actually the most time consuming part of the project. After getting a wing lined up as close as possible, I would mark the two outer bolt holes. I then drilled the through hole. If you look in the picture around the edge you will see large holes in the bottom. These were drilled using a forstner bit, and then using a chisel and hammer, made a flat surface for the nut & washer to bite into. After cutting each of these (8 in all) a lot of time was spent with lining up with wings. This included widening the through holes with a rasp, tightening and loosening bolts, and finally some brute force with the rubber mallet. After finally getting everything even, I did a final check to make sure all the bolts were good and tight.

Update 3/6/2013 – I have been using the setup for not quite 2.5 years now.  The wings have worked out fairly well, and do occasionally need readjustment.  The fence has been great!  I do try to keep the guides as clean as possible and well waxed.  The fence still glides as smooth as the day I installed it.  There was a point about a year ago that I thought I was going to have to replace the saw.  Luckily the issue was repairable, and the saw is still useable.  However, if I had to replace the saw, most likely that fence would have been put on the replacement saw.